How to Convert Your Chlorine or Saltwater Pool to a Mineral Pool: A Step-by-Step Guide

Are you tired of the harsh chemical smells of chlorine or the dryness left by saltwater pools? What if you could enjoy softer, cleaner water with fewer chemicals, all while reducing maintenance time and costs? It’s time to consider switching to a mineral pool—one of the latest trends in pool sanitation that offers a more natural, health-conscious swimming experience.
Mineral pools use natural minerals such as copper, silver, and magnesium to sanitize the water. By making the switch, you can reduce the amount of chlorine used, resulting in clearer, gentler water for your skin, eyes, and respiratory system. Whether you’re looking for a more eco-friendly option or simply want to experience better water quality, converting to a mineral pool is an exciting step. This step-by-step guide will walk you through the entire process, from draining your pool to maintaining your new mineral system.
Not only is a mineral pool healthier for you, but it’s also a long-term investment that can help improve the sustainability of your pool while providing a luxurious swimming experience. Let’s dive in!
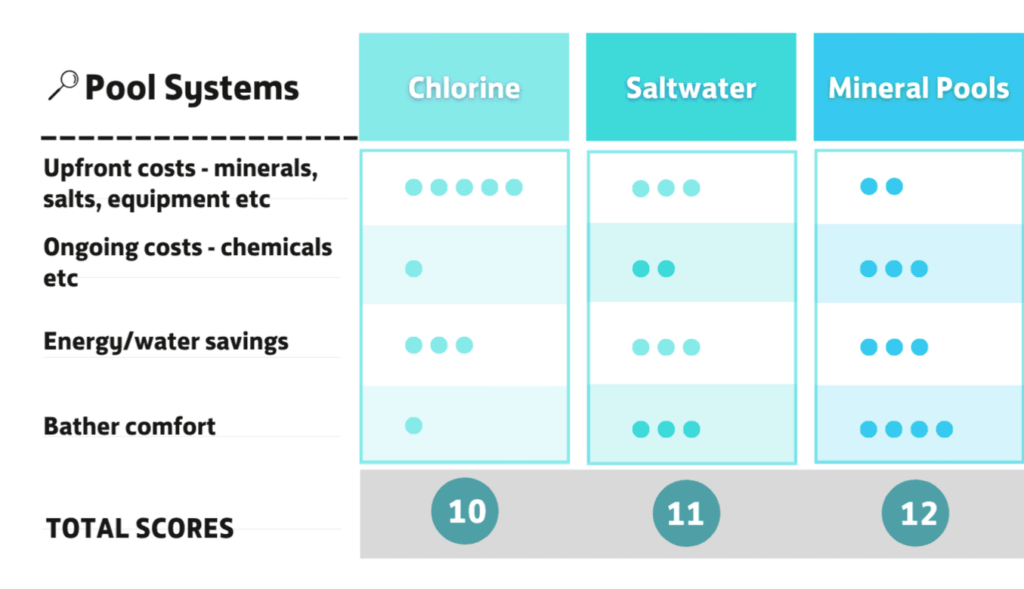
Why Switch to a Mineral Pool?
Before diving into the conversion process, let’s first explore why a mineral pool is a great choice:
Less Chemical Use: Mineral systems reduce the need for harsh chemicals like chlorine, stabilizers, and other synthetic chemicals, making your pool safer for both swimmers and the environment. With mineral pools, you rely on naturally occurring minerals like copper and silver to sanitize the water, keeping it cleaner with minimal chemical intervention. This not only benefits the environment but also reduces the wear and tear on pool equipment caused by excessive chemical usage.
Softer Water: One of the standout benefits of a mineral pool is its silky-soft water. The addition of minerals like magnesium softens the water, creating a luxurious feel that’s gentler on your skin, eyes, and hair. If you’ve ever felt your skin dry out after swimming in a chlorinated pool, you’ll appreciate how soothing mineral water is to the touch.
Reduced Maintenance: Mineral pools typically require less maintenance than traditional chlorine or saltwater pools. Because the minerals actively help to prevent algae growth and bacterial buildup, you’ll spend less time cleaning and treating the pool, leaving you more time to enjoy it. This results in fewer chemical treatments, as well as a simpler filtration and cleaning process.
Eco-Friendly: Fewer chemicals mean less environmental impact. In addition to reducing your carbon footprint by using natural minerals, some systems also utilize solar energy to power their filtration systems, making mineral pools an excellent option for eco-conscious pool owners looking to reduce their energy consumption.
If you’re already using a chlorine or saltwater pool, the good news is that converting to a mineral system is easier than you might think. Let’s walk through the steps!
Steps to Convert Your Chlorine or Saltwater Pool to a Mineral Pool
If you’re already using a chlorine or saltwater pool, the good news is that converting to a mineral system is easier than you might think. Let’s walk through the steps!
Step 1: Drain and Clean Your Pool
The first step in converting to a mineral pool is draining your pool. Completely emptying the pool ensures that all the old chemicals—whether chlorine or salt—are removed, so they don’t interfere with the mineral system.
Draining your pool may sound like a daunting task, but it’s essential to prepare your pool for a fresh start. It’s important to note that some areas may have local regulations about how much water you can drain from a pool at once, so be sure to check with your local authority if you’re unsure.
Once drained, give your pool a thorough cleaning:
- Scrub the pool walls and floor to remove any buildup of scale, algae, or dirt. The cleaning process may require different equipment depending on your pool’s surface type—tile, fiberglass, or vinyl. Consider using a non-abrasive cleaner to avoid scratching delicate materials.
- Clean the skimmer baskets, pump, and filter to ensure no debris is left behind. Any leftover debris or chlorine residue can affect the balance of your new mineral system, so it’s crucial to remove any remnants of previous chemicals.
Pro Tip: Use a soft brush when cleaning, especially if your pool has delicate tiles or surfaces. After cleaning, let the pool dry out for a day or two before filling it up again to ensure any remaining moisture evaporates.
Step 2: Install the Mineral Sanitizer System
Now that your pool is clean, it’s time to install your mineral sanitizer system. Mineral pools work through a mineral sanitizer, which releases natural minerals into the water to disinfect and clarify it. There are a few types to choose from, each with its own set of benefits:
- Copper-Silver Systems: These use copper and silver ions to kill bacteria and algae. The copper works to eliminate algae, while the silver combats harmful bacteria. This combination is especially effective at preventing algae growth, leaving you with cleaner, clearer water.
- Magnesium Systems: Known for creating soft, silky water that’s gentle on the skin, magnesium is an excellent choice if you have sensitive skin or want to enhance the overall swimming experience. Magnesium also helps reduce water hardness, so you’ll avoid buildup on the pool surface and filter system.
- Hybrid Systems: These combine minerals with other sanitation methods like UV light or ozone for a more comprehensive approach. Hybrid systems provide additional protection against waterborne pathogens, ensuring your pool remains fresh and safe for swimming.
Depending on the system you choose, you may need to install a special filter or sanitizer cartridge. Some systems are designed to work with your existing filtration setup, while others may require a separate filtration system. Installation can be DIY if you’re handy, but it’s advisable to call a professional if you’re unsure about handling the technical aspects.
What You’ll Need:
- Mineral sanitizer system (copper, silver, magnesium, or hybrid)
- Necessary installation kit
- A pool technician (if needed for installation)
Expert Tip: If you’re unsure which system is right for your pool, it’s always a good idea to consult with a pool professional. They can recommend the best mineral system based on your pool size, water conditions, and personal preferences. If you live in an area with hard water, for example, a magnesium-based system might be more beneficial.
Step 3: Balance Your Water Chemistry
Once the system is installed, you’ll need to balance your pool’s water chemistry. For a mineral pool to work effectively, the pH, alkalinity, and calcium hardness must be at the right levels. This is crucial because improper water chemistry can affect the performance of your mineral sanitizing system.
The most important water parameters include:
- pH Level: 7.4–7.6 is ideal for mineral pools. The pH level determines how acidic or alkaline the water is, and having a balanced pH ensures that the minerals function as they should. A pH that’s too low or too high can lead to cloudy water and reduce the effectiveness of the minerals.
- Alkalinity: 80–120 ppm (parts per million). Alkalinity acts as a buffer to help maintain pH stability. When your alkalinity is balanced, it reduces the chances of pH swings and ensures the pool water remains balanced for longer.
- Calcium Hardness: 200–400 ppm is the ideal range. Calcium hardness is the amount of dissolved calcium in the water. Too much calcium can cause scaling, while too little can lead to damage to the pool surface.
Test your water with a reliable pool test kit or have it professionally tested. Make any necessary adjustments to bring the water chemistry into balance before proceeding.
Step 4: Fill Your Pool with Fresh Water
Now it’s time to fill your pool with clean, fresh water. It’s important to use filtered water to avoid introducing any contaminants or minerals that might interfere with your new mineral system. If you use well water or untreated water, it’s a good idea to test the water first before filling your pool to ensure it meets the required standards.
As the pool fills, continue to monitor the water levels to ensure that everything is working as it should. If your pool has a floating cover or a similar device, ensure it’s removed while filling the pool so you can check for any leaks or issues with your system.
Step 5: Add Stabilizer and Additional Minerals
To help your mineral system perform at its best, you may need to add additional minerals or stabilizers. These minerals act as a support system for the sanitizer, helping to keep your pool water cleaner for longer. Depending on the system you’re using, this could include:
- Magnesium: Helps improve water softness and reduces the chance of buildup on the pool surface and plumbing.
- Copper: Provides antibacterial properties, keeping the water clear and free from algae.
- Silver: Works to prevent algae growth and bacteria, ensuring your pool remains sparkling clean without the need for high chlorine levels.
Use the mineral kit provided with your system or consult the manufacturer’s instructions for recommended amounts. After adding the minerals, test your water again to ensure the mineral levels are within the appropriate range.
Step 6: Adjust Chlorine Levels (If Needed)
Although mineral pools use fewer chemicals, you may still need to add a small amount of chlorine to initially kickstart the sanitization process. Over time, as your mineral pool stabilizes, the chlorine levels should drop to a minimal level.
If you’re transitioning from a saltwater pool, you’ll also need to adjust the salt concentration. A high level of salt can interfere with the mineral system, so it’s essential to test the salt levels and adjust them as necessary.
Step 7: Enjoy Your Mineral Pool!
Once your mineral system is set up and the water chemistry is balanced, your mineral pool is ready for swimming. Expect softer water, fewer chemical smells, and an overall more natural swimming experience. You’ll be able to enjoy clearer water that’s easier on your skin, making your pool a more pleasant environment for both relaxation and exercise.
Maintaining Your Mineral Pool
While mineral pools require less maintenance compared to traditional chlorine or saltwater pools, it’s important to stay proactive to ensure your pool remains clean, safe, and efficient. Here are a few additional tips for maintaining your mineral pool:
Regularly Clean Your Pool: Skim debris, leaves, and insects from the pool surface daily. This will help reduce the amount of dirt that enters the pool and prevents clogging your filters.
Inspect and Clean Your Filter: Your filter will continue to play an important role in keeping the water clean. Even though mineral pools use fewer chemicals, they still need filtration. Clean the filter every few months, or more often if your pool experiences high levels of debris or heavy usage.
Monitor Pool Equipment: Check your pool pump, heater, and mineral system regularly to ensure everything is functioning as it should. Malfunctioning equipment can lead to water imbalance, which can affect the quality of your pool’s water.
Top Up Minerals When Needed: After the initial conversion, you may need to top up the minerals every 3-6 months to maintain the optimal sanitizing levels. Check the manufacturer’s recommendations for the mineral system you’re using.
Troubleshooting Common Issues in Mineral Pools
While mineral pools offer many benefits, like all pools, they can sometimes encounter issues. Understanding how to troubleshoot and resolve these problems will help you enjoy a worry-free pool experience:
- Cloudy Water: If your mineral pool water becomes cloudy, it may be due to an imbalance in the mineral levels, pH, or alkalinity. Test your water and adjust the chemistry as needed. Cloudiness can also occur if there’s an excess of organic material in the water, so ensure regular cleaning and filtering.
- Algae Growth: If algae start to develop, check that your copper or silver levels are sufficient. You might need to adjust the amount of minerals or run the filtration system for longer to clear up the algae.
- Low Mineral Levels: Over time, minerals can deplete due to usage, evaporation, or backwashing. If the water feels less soft or the sanitizer effectiveness drops, it’s time to replenish the minerals.
By following these steps, you can troubleshoot most common issues and ensure that your mineral pool remains clean and inviting year-round.
Embrace a Healthier, Eco-Friendly Pool Experience
Converting to a mineral pool is a rewarding process that offers cleaner, softer water with fewer chemicals. By following this step-by-step guide, you’ll be well on your way to enjoying a more eco-friendly and healthier swimming experience. Whether you’re motivated by the health benefits, the reduced maintenance, or the eco-friendly aspect, transitioning to a mineral pool is a step toward a more sustainable and enjoyable pool experience.
Ready to take the plunge? Contact a pool professional today for a consultation and start enjoying your new mineral pool tomorrow!